Monday 30 June 2014

Natalie & Amy 'Summertime' Challenge

Good morning. I am going to get straight into what I am here for today and that is the new challenge at Natalie & Amy's Challenge. This month we are looking for projects which show 'Summertime'

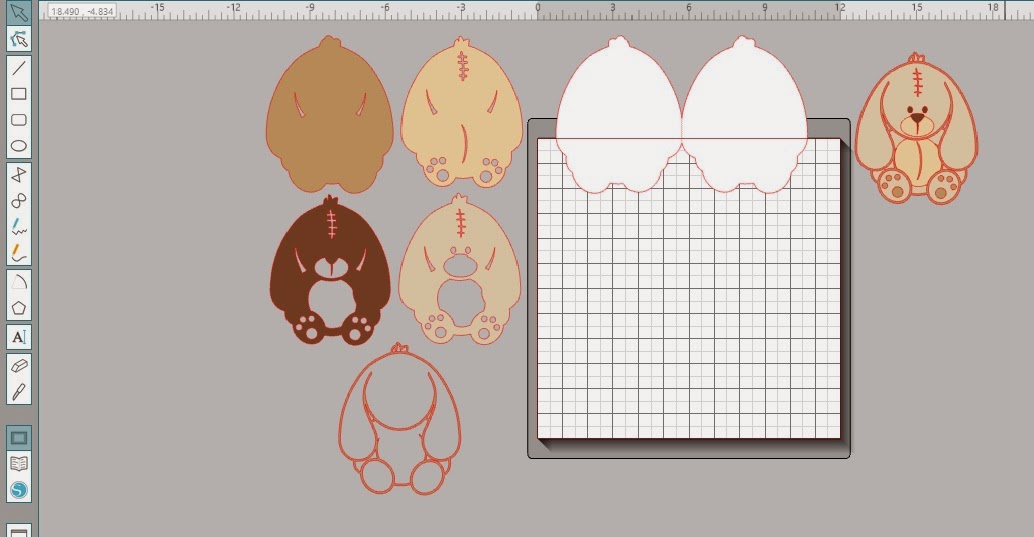
I made this card for a neighbour who loves to spend his time in the garden but not necessarily tending it lol. I used this adorable little bear from the Crafter's Companion Mulberry Wood range called 'Relax Everyday'. My paper's are from the First Edition 'Summer Breeze' collection.  All linked below photo. 

Supplies:-
6" Square Card Blank - Natalie & Amy's
Card Stock - Bazzill
Charm - Stash

Items in red are available in Natalie & Amy's store found HERE.

Promarkers & Flexmarkers Used:-
Teddy - Chestnut, Nutmeg, Saddle Brown & Sandstone
Ted's Puppy - Walnut & Champagne
Fork - Ice Grey 1 & 3, Walnut & Saddle Brown
Newspaper - Blue Grey 1 & 2
Deck Chair - March Hare, Tan, Light Fawn, Poppy, Chilli Red, Hot Pink, Marsh Green, Olive Green & Pesto
Boots & Grass - Grass, Meadow Green & Marsh Green

Challenges I would like to enter this into:-

That is all for today, see you soon and be creative.


Saturday 28 June 2014

My Time To Craft 'Christmas In June' Challenge

Good morning people it is lovely to have you here. It has been one of those week's this week where lots has been done but I feel like nothing has been achieved! 

We are off to the circus this evening with the grandchildren and it should be really good as none of them have ever been before which really surprised me. I do think it is a shame that the real old fashioned circus has gone although for the animals I am really glad.

Anyhow this fortnight at My Time To Craft we are looking for 'Christmas In June', so you now have the chance to get ahead with all those cards that in November you are panicking about!! I went with this sort of old fashioned Christmas card, the papers have that old feel to them and the image which I adore is one that can be used in many era's. I coloured this in more traditional fashioned colours but just added a little bit of purple to mix it up. The ribbon is purple but on my screen it looks black so not sure what you are seeing, it could be the green card stock behind that is causing that.

Supplies:-
6" Card Blank - Natalie & Amy
Card Stock - Bazzill
Sentiment - Crafty Sentiments
Ribbon - Crafty Ribbons

Promarkers & Flexmarkers Used:- 
Skin - Coral, Sunkissed Pink & Blush
Hair - Walnut, Auburn & Saddle Brown
Greens - Khaki, Pastel Beige & Soft Khaki
Purples - Purple, Lilac & Soft Mauve

Challenges I would like to enter this card into:-
Stampin' For The Weekend - Anything Goes 03/07
Addicted To Stamps & More - Anything Goes 01/07
Crafty Girls - Anything Goes 03/07
Fab n Funky - Christmas 01/07
Simon Says Stamp - Anything Goes 02/07
Party Time Tuesdays - Anything Goes 30/06

That's all for today, see you soon and have a great weekend.

Sunday 15 June 2014

My Time To Craft 'Make It DL Size' Challenge

Oh dear I have completely lost tracked of the days just lately. I was really unwell on Friday and that has thrown me a day and then I just noticed my card hadn't published for this week's My Time To Craft challenge only to realise that it was not only Sunday but I hadn't even written! Yet my card has been made for nearly two weeks, what do I do with myself, don't ask David as I am sure I know what he would say lol

Ok so this fortnight at My Time To Craft we are asking to see your DL sized cards, I had never made a card this size before until now.  I was at a car boot sale a few weeks ago and picked up this large and I mean large box of Kanban goodies that was all Christmas themed, I actually brought it thinking the kids could have some fun with it, however I ended up keeping quite a few bits and my card is the result. It was super quick to make and I really feel like I cheated. 

I just tried to search for this kit and this particular card seems to have come from a 2011 Christmas Kit. One A4 reindeer sheet is selling for £1.25 and then the card blank is extra. I purchased approximately 50 different sheets, 30 card blanks and 30 sheets of patterned card all from this kit then about the same from an everyday kit and a birthday kit all for.................£3.00 and my mum was telling me off after I paid for not haggling with the women lol, wait until I tell her what a bargain I got.   

Supplies:- 
All from Kanban 2011 Christmas Kit

So now it is time to pop over and see what the other ladies made and join in with the challenge.

Sunday 8 June 2014

Silhouette 'Create Your Own Shaped Card'

It's the time for another challenge over at

Ch# 14 Create your own Shaped Card 
(No pre designed shaped card files)
Begins: Sunday, June 1
Ends: Monday, June 30

A blog dedicated to the Silhouette Cutting Machines.
You MUST use a Silhouette somehow in your project.

Sponsor this month is:


(3) Silhouette Replacement Blades

Ok so for my card I used this adorable 'Stuffed Bunny' file by Miss Kate Cuttables #57164 and available from the Silhouette Store. One of the questions I get asked a lot is "how do I make the card front whole and not have the score line showing with the edge cut off". So I have taken some photo's along the way to try and show this. 

  1.   Once you have your imported shape on the mat build it up to how it will look once finished
  2. Next group those pieces together and resize to the desired size and copy it. Place the copy on the right have side of the mat so you always have a reference to go back to.
  3.  Now ungroup the other set and lay all the pieces out on the left of your mat in the build order and colours you are going to cut them (see first image below).
  4. If the image has a solid base layer use this to create your shaped card base, if it doesn't have a solid base make an offset before you ungroup your pieces.
  5. With the base layer, offset it to the desired size, make a copy of it and place one of them back with your pieces on the left, mirror the other piece to the left creating the back of your card. Nudge these together so they just overlap enough to weld, once happy weld them. Using the line tool, and whilst holding the shift key down to ensure a straight line, draw a line between your welded pieces. Once you are happy that it is centred change this line to a dashed line in the cut settings. Group the card base and line together and fill with the colour you have chosen for the base.
  6. If your base layer has any cut outs in it you want to transfer these to the offset layer you made by centring the 2 pieces and then releasing the compound path. You will now be able to delete the smaller base layer leaving the cut outs on the offset base layer, next select all the pieces along with the offset layer and make a compound path.
That is all there is to it. 

The white card base seen below is the same size as the base layer seen top left hand side of mat and the other pieces are all slightly smaller and layer on top.

Here is the card base after cutting but before scoring.

Here is the card base with the first layer in place.

This is the edge showing how the first layer covers the score line.

Here is my finished card.
Supplies:-
Card Stock - Bazzill


I hope this helped those of you that have asked how I make a shaped card without the blunt score edge.

Head in over to see what the DT has created for you inspiration and link up today.
Click HERE

Saturday 7 June 2014

Crafty Calendar 'Petals & Pearls' Challenge

Good morning all.

Today see's the start of a new challenge over at Crafty Calendar Challenge and this month we want to see 'Petals & Pearls' on your projects, nice and easy you can use any kind of petals and then add your pearls.

We have a fantastic sponsor Dilly Bean Stamps who gave us some great images to play with as well as a prize for one of you. I have chosen Crinkles Daisy Framed, unfortunately the frame doesn't stand out to much with this deep purple card stock behind it I should have used another colours! Crinkles is coloured as always with Promarkers & Flexmarkers then I added a little cappuchino coloured pearl for this nose. My flower and sentiment are both from the Silhouette Store and links are in the supplies list below. 

Supplies:-
6" Square Card Blank - Natalie & Amy's
Card Stock - Bazzill
Designer Paper - Bo Bunny Jazmyne
Medium - Promarkers & Flexmarkers

Promarkers & Flexmarkers Used:-
Hedgehog - March Hare, Tan, Cocoa, Cinnamon & Baby Pink
Flower - Moss, Cerise & Plum.

That's all folks, I'll be back tomorrow with my Silhouette Challenge Card and let me tell you it is so so cute.

Have a great weekend all.