Showing posts with label Miss Kate Cuttables. Show all posts

Saturday, 21 February 2015

My Time To Craft 'Lace' Challenge

Good morning all, thank you for joining me. I wish this weather would decide what it wants to do, it is freezing one minute and then lovely and warm the next. 

My apologies this post should have been up this morning but between feeling ill and being busy it just didn't happen because it was still sat in drafts lol. I am so not good with making in advance because I forget to post them!

Anyhow onto the matter in hand, it is time for a new challenge over at My Time To Craft and this week we want to see your 'Lace'. Nice and easy for some but quite a challenge for others, give it a go you might just surprise yourself!

For my card today I used this amazing image which I brought about a year ago and have never used, that is so bad especially as it is so so adorable. I used papers from my scrap box and just played around with them. I added two rows of lace across the card before attaching a bow made from the same lace.

 Supplies:-
6" Square Card Blank - Natalie & Amy's
Card Stock - Bazzill
Designer Papers - All From My Scraps Box
Lace - Let's Create

Promarkers, Flexmarkers & Pencils Used:-

Giraffe - Mustard, Pastel Yellow & Daffodil Bloom + 11, 13 & 17. Tan, March Hare & Satin + 109, 110 & 111. Warm Grey 1, 2 & 3 
Bird & Flowers - Blossom, Pink Mittens, Pale Blossom + 34, 35 & 41

Challenges I would like to enter this into:-
Creative Card Crew - Birthday With Sentiment 01/03
ABC Challenge - D For Die Cuts 01/03


Thursday, 25 December 2014

Elisabeth Bell's World 'Shaped Card' Challenge

Merry Christmas 
I hope you are all having a fabulous time whatever you are up to!
This is my second post of the day please scroll down for my Digi Bells post.

As I am sure no one is actually reading this on Christmas Day I decided you would all of seen enough Christmas cards by now to last you until next Christmas lol so went with another event in the calendar.

I am still the guest designer over at Elisabeth Bell's World Challenge and this month we would like to see your 'Shaped Cards'. I used the adorable 'Heart Strings' from Sweetpea Stamps. For my card I used a layered doily set I found in the Silhouette Design Store and taking the base shape I copied it, then lined them up together and welded them in Silhouette Studio so that when this now one piece cut it created my card base.  I then cut all the others layers as needed plus the little heart pennant you see at the top of the photo. 

Supplies:-

Promarkers, Flexmarkes & Copics Used:-
Skin - E21, E51, E50 & R20
Hair - Earth Yellow, Sandstone & Champagne
Jumper, Hairband & Patch - Maroon, Pink Lobster & Trick or Treat
Jeans & Hearts - French Navy, True Blue & Azure


Saturday, 22 November 2014

Guest DT For Elisabeth Bells Digi World Blog

Good evening I am here to share another make for my time on the Digi Bell's Design Team.

Today I have a Christmas card I made using Eden's Second Christmas from Elisabeth Bell's Digi Collection and I used it to make a card for a young child. I added a couple of embellishments cut on my Silhouette Cameo to finish it off.

Supplies:-
6" Card Blank - Natalie & Amy's
Card Stock - Bazzill
Sentiment - Silhouette (See Below)

A closer view of the image & colours used:-

Challenges I would like to enter this into:-
Crafter's Companion - Christmas 30/11
Bearly Mine - Christmas Cards 01/12
Crafty Hazelnut - Getting Ready For Christmas 01/12
Hiding In My Craftroom - Any Holiday 30/11
Die Cut Diva's - Any Holiday 01/12
Mema's Crafts - Anything Goes 01/12

Thanks for stopping by and sorry for the wrong AM/PM post time.

Wednesday, 1 October 2014

Silhouette Challenge #18 Holiday Home Decor

Good morning everyone.

It's the time for another challenge over at Silhouette Challenges.

ADD YOUR PIC AND INFO HERE

Challenge Info. 
Hop on over and link up today.
Ch# 18 "Holiday Home Decor" (no cards)
Begins: Wednesday, October 1
Ends: Friday, October 31

A blog dedicated to the Silhouette Cutting Machines.
You MUST use a Silhouette somehow in your project.

Head on over to see what the DT has created for you inspiration and link up today.
Click HERE

WARNING Photo heavy.

My family are all coming to my house for Christmas this year so I was looking to create something to go on my window ledge in the bay window as it is a lovely big space that could take it. I have decided to make a winter wonderland scene with shops and buildings so if any of you see any lovely 3d buildings please let me know I would be extremely grateful. 

What I have today is Harley's, I am also making another of these for Mia but it isn't quite finished as yet. I will then look into making some shops or building for my older grandchildren. 

I love how this house turned out, I used Lori Whitlock's Gingerbread House which comes in three parts and then added a few other bits as listed below main image. I have tried so hard to show this in the dark as it lights up beautifully with just two little tea lights in it but all I keep getting is photo's of the windows lol there must be some technical button I should have pressed.


On this view you can see I added the banner with Harley's name sketched on, I decided to hang my wreath with bakers twine rather than stick it and I also added glossy accents to it. A brad for the door handle and some gems for the gingerbread man's eyes and buttons to finish this side off.

On this side I decided to use Christmas light bulbs instead of the circles that came with it. I did add a star to the top of the tree but it is not easily seen with the overhanging roof.


I couldn't decide whether or not to add another tree on this side or not so it may get changed as yet.

Supplies:-
Card Stock - Bazzill
Designer Papers - A really old DCWV pack from 2009 I think
Brad, Gems & Twine - Stash
Glossy Accents - Ranger
Pen - Silhouette
Die Cuts - 3d Gingerbread House #22479, #22480 & #22481 by Lori Whitlock, Christmas Lights #51704 by Miss Kate Cuttables, Assorted  Curved Party Buntings #44263 by Totally Jamie & Star Charm #17340 by Silhouette.

Challenges I would like to enter this into:-
Holly Jolly Christmas - Anything Goes Christmas 12/10
Crafting Desert Divas - Anything But A Card 12/10

Now it is your turn to create some home decor for us to see.


Saturday, 5 July 2014

Silhouette Challenges Special Challenge Glass Etching

"Special Challenge - Glass Etching" over at

"Special Challenge Glass Etching"
Begins: Saturday July 5
Ends: Sunday, July 20

A blog dedicated to the Silhouette Cutting Machines.
You MUST use a Silhouette somehow in your project.

This is in addition to our regular monthly challenge.

DT members were not required to participate.
We have 8 participating.

Sponsor is:

Winner will receive:
Silhouette Cameo Replacement Cutting Mat

Winners for any challenge is announced on the Winners page on the 3rd day of the following month after a challenge ends.

If you have never used the Silhouette for glass etching here is a how to video.


Good morning people and thank you for joining us in this special challenge. I have played with glass etching before and so decided to try something different with it this time. Firstly I will show you my glass that I did with 4 different files from the Silhouette Store. I placed the red card inside the glass to help the design show up.


The longest part of making this was the time I had to leave the cream on between each design, I tried to do it it in one go first but of course the cream spread and left dripped marks around the bottom of the glass.

Now here is my second item which is a black 4" wall tile with a gloss finish, I did this exactly the same as the glass. It almost removes the gloss finish leaving the image looking like it has been cut out of the tile, it looks much more impressive in real life.

Supplies:-
Tile & Glass - My Stash
Vinyl - Freebie from a local designer
Die Cuts Used - Love Dance Title #44468 Miss Kate Cuttables, Dancer #47414, Dancer #41876, Dancer #47412 all by Rivka Wilkins.


What are you waiting on? Step outside your comfort zone and join in the fun.

Link up your projects below.

Sunday, 8 June 2014

Silhouette 'Create Your Own Shaped Card'

It's the time for another challenge over at

Ch# 14 Create your own Shaped Card 
(No pre designed shaped card files)
Begins: Sunday, June 1
Ends: Monday, June 30

A blog dedicated to the Silhouette Cutting Machines.
You MUST use a Silhouette somehow in your project.

Sponsor this month is:


(3) Silhouette Replacement Blades

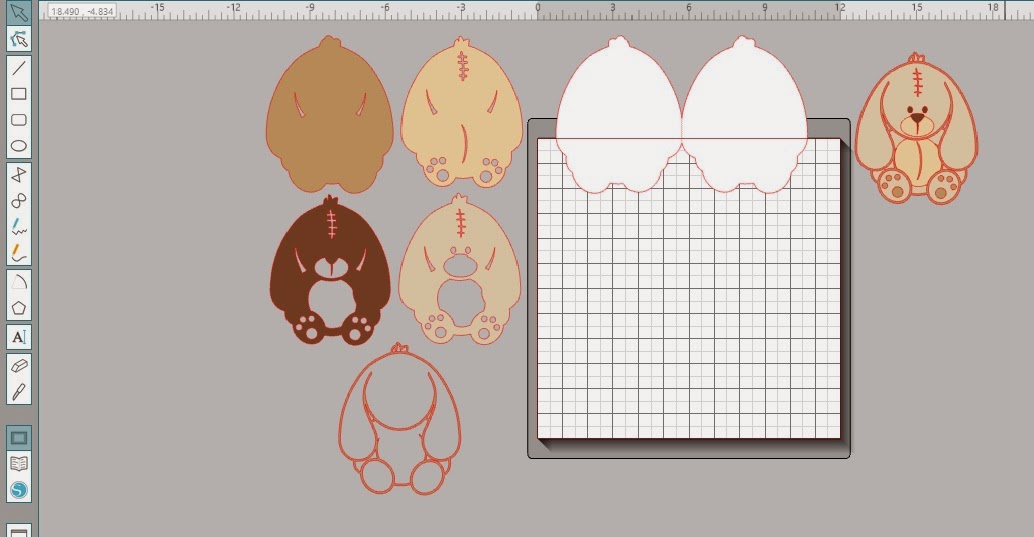
Ok so for my card I used this adorable 'Stuffed Bunny' file by Miss Kate Cuttables #57164 and available from the Silhouette Store. One of the questions I get asked a lot is "how do I make the card front whole and not have the score line showing with the edge cut off". So I have taken some photo's along the way to try and show this. 

  1.   Once you have your imported shape on the mat build it up to how it will look once finished
  2. Next group those pieces together and resize to the desired size and copy it. Place the copy on the right have side of the mat so you always have a reference to go back to.
  3.  Now ungroup the other set and lay all the pieces out on the left of your mat in the build order and colours you are going to cut them (see first image below).
  4. If the image has a solid base layer use this to create your shaped card base, if it doesn't have a solid base make an offset before you ungroup your pieces.
  5. With the base layer, offset it to the desired size, make a copy of it and place one of them back with your pieces on the left, mirror the other piece to the left creating the back of your card. Nudge these together so they just overlap enough to weld, once happy weld them. Using the line tool, and whilst holding the shift key down to ensure a straight line, draw a line between your welded pieces. Once you are happy that it is centred change this line to a dashed line in the cut settings. Group the card base and line together and fill with the colour you have chosen for the base.
  6. If your base layer has any cut outs in it you want to transfer these to the offset layer you made by centring the 2 pieces and then releasing the compound path. You will now be able to delete the smaller base layer leaving the cut outs on the offset base layer, next select all the pieces along with the offset layer and make a compound path.
That is all there is to it. 

The white card base seen below is the same size as the base layer seen top left hand side of mat and the other pieces are all slightly smaller and layer on top.

Here is the card base after cutting but before scoring.

Here is the card base with the first layer in place.

This is the edge showing how the first layer covers the score line.

Here is my finished card.
Supplies:-
Card Stock - Bazzill


I hope this helped those of you that have asked how I make a shaped card without the blunt score edge.

Head in over to see what the DT has created for you inspiration and link up today.
Click HERE

Saturday, 8 March 2014

Silhouette 'Create Your Own Scene Card' Challenge

Good morning all, well the sun has finally found it's way through the clouds here in UK, I hope where ever you are it is getting better and not worse. This is my first post today to see my My Time To Craft post please look HERE.

For this challenge I decided to create a fish bowl card as an anniversary card for my husband, for those who don't know we keep marine fish in a tank a little bit larger than this but not quite as pretty lol. 

Anyhow I made this card by first sketching my sentiment and then cutting my bowl at 8" wide by 7.25" tall, I then cut an acetate front with a flap added to the top so that it would fold over and attach to another layer that I created in white to make what I think is known as a tent fold style of card. I used 3 different cutting files for all the fun little characters, plenty of ink on all my pieces before arranging with foam pop dots to give some dimension. I did try to take a sideways photo but because of the acetate it just was not possible. 

This first photo is taken before adding the acetate.

 This photo has the acetate layer attached as the bubble in the top left corner shows and if you look close you can just see it along the edge on the left hand side. 
Supplies:-
Card Stock - Bazzill 
Acetate - Stash
Fish In Bowl #39243 by Miss Kate Cuttables, Underwater Scene #30279 & Underwater Scene #30395 both by Sarah Bailey 

Please pop over and see the beautiful projects the other girls have made HERE.

Thursday, 30 January 2014

Natalie & Amy's 'Love Is All Around' Challenge

Good morning all, I hope today finds you well and you are all keeping warm. I also hope Mr Blogger has played nicely and posted this for me while I am away visiting my daughter and getting lots of Mia cuddles, I cannot believe she is 2 months old already. 

Anyhow today see's a new challenge at Natalie & Amy's which is 'Love Is All Around' and you must use at least one heart on your creation. I thought I would have a go and see how I got on with colouring an image for this challenge but it was not the best idea, I am still finding it hard to hold the pens for any time and got quite frustrated with it. I will be seeing a new Neurology consultant on Saturday and hope he can shed some light on the matter.

So for my card I used a stamp I have had for a while from DoCrafts Me To You range called 'Loving Company', coloured with Promarkers & Flexmarkers and paired this with First Editions J'Adore patterned papers. I used a Kaisercraft stamp set called Just Believe for the calendar sentiment and coloured in the date with a Promarker. I added this really pretty hanging hearts style border which I cut on my Silhouette Cameo but it doesn't show up too well as I should have chose a solid coloured paper for it, I didn't have time to change it. Then just a couple of gems to finish it off. All supplies used are linked below to the Natalie & Amy Craft Shop

Supplies:-
6" Card Blank - White 6" Card Blanks
Card Stock - Bazzill
Designer Paper - First Edition J'adore 6" Paper Pack
Mount for Calendar - 3d Foam Squares
Gems - 5mm Mixed Colour Round Gems
Die Cut - Heart Borders #54176 Miss Kate Cuttables

Promarkers & Flexmarkers Used:-
 
Tatty Ted - Blue Greys 1-5, Sky Blue & Cyan
Chocolate Box & Rose - Burnt Umber, Firebrick & Rosewood
Ribbon - Fuchsia Pink & Pink Carnation
Flower Stem - Grass (not sure why it is not showing in photo lol)

That is all from me for today, have a great weekend all and thanks for stopping by. 

Saturday, 4 January 2014

Crafty Calendar 'Celebrate' Challenge

Good morning and
 Happy New Year
 to you all. Apologies for this post being later I scheduled it then must have pressed save instead of publish lol. It has been a bit wet so far but not too cold, do you think we will get a real winter? We celebrated the New Year in with a meal out for David's birthday and then looking after little Harley so his mum and dad could go out. I hope whatever you were doing you enjoyed it and there was not too many sore head's the next day. 

Today see's a new challenge at Crafty Calendar Challenge and this month our challenge is 'Celebrate', so many different reasons for this one. 

For my card which was made for my granddaughter I made a stand up card with a stand on the back but forgot to photograph that bit. It is shaped and made using a cutting file Miss Kate Cuttables which was a freebie. I made it about 7" x 5" and used lots of nice brights colours. The little stars on the balloons have liquid pearls on them but it can't be seen.

Supplies:-
Card Stock - Bazzill
Die Cut - Happy New Year by Miss Kate Cuttables

That is all from me, I will be back shortly with my My Time To Craft post.
Have a great weekend and stay dry, the forecast looks awfully wet.

Saturday, 7 December 2013

Crafty Calendar 'Cold & Frosty' Challenge

Hello again, if you called by looking for my My Time To Craft post you will find it below this post. 

Right it's the first Saturday of the month and that means it is time for a new challenge at Crafty Calendar Challenge. This month we are challenged to 'Cold and Frosty' perfect for this moment in time!

When I came to making this card I was really stuck for what image to use as there are so many possibilities but after I spotted this mitten border by Miss Kate Cuttables in the Silhouette Store I went straight for this snowman image by Stitchy Bear called 'Snowman Trio'. I used pattern paper from the Dovercraft 'Ho Ho Ho' collection. Embossed a panel using the Cuttlebug Snowflake folder and then a snowflake die cut from the Tim Holtz Mini Snowflakes die covered in Glamour Dust. 

Supplies:-
6" Square Card Blank - Boyes
Card Stock - Bazzill
Designer Papers - Dovercraft 'Ho Ho Ho'


 Promarkers & Flexmarkers Used:-
Snow Family - Celestial Blue, Sky Blue & Arctic Blue, Heatwave, Molten Red, Sunset, Lipstick Red, Vanilla, Buttercup & Eggnog, Olive Green, Marsh Green & Apple Cider, Cocoa, Caramel & Tan.

Challenges I would like to enter this into:-

That is all from me for today, have a good weekend and stay safe.

Friday, 16 August 2013

Sparkles Monthly 'Up, Up And Away' Challenge

Good morning all, what happened to the weather? we had such a lovely day yesterday taking Harley to a parrot sanctuary and small animal zoo in glorious sunshine and today it is yuck as Harley would say with really heavy rain bursts. 

Anyhow today see's the start of a new challenge over at Sparkles Monthly and this month we are challenged to 'Up, Up & Away' so we want to see balloons either the party popping type or as I used hot air balloons. As soon as I saw this challenge I knew this was the card I was going to make. The reason for it is because when I did a craft fayre a few weeks ago I was asked for a Bon Voyage card which I didn't have and the lady quoted 'I would prefer a hot air balloon as these always appeal to my friend to be the perfect way to set off for unknown territory' and I have to agree that kind of appealed to me too, not that you would get me into one mind you lol.

We have a great sponsor this month in Crafty Ribbons who are offering the prize below.


Ok so this was the easiest card to make and the whole thing was created on my cameo using the print and cut feature with a filled pattern.  The sky background is a patterned paper named clouds5 that came preloaded on the silhouette software and I just created a 5.5" box to place it in. I then added the balloons and clouds from the Hot Air Balloons file from Miss Kate Cuttables, printed this as one layer then just cut out around the square edge. Next I printed and again cut the balloons and clouds so that I could pop them up at different levels trying to make the balloons and clouds look like they were at different heights and distances. The sentiment was just typed by myself and then offset before cutting around. I inked all the elements and that is all there was to it. Super quick and easy to make but I quite like the effect.

Supplies:-
6" Square Scalloped Card Blank - Natalie & Amy
All White Card - Rymans
Ink - Ranger Distress Ink 

Challenges I would like to enter this into:-
Crafts & Me - Anything Goes
The Perfect Sentiment - The Great Outdoors
Try It On Tuesday - Create A Scene
Crafty Boots - Die Cuts
Make My Monday - 3d Elements
Aud Sentiments - Not A Birthday Card

Thanks for stopping by, see you all soon.

Tuesday, 30 July 2013

Natalie & Amy's 'Celebrate' Challenge

Good morning all. Well I know I haven't been around for over a week but there should have been a scheduled post on Saturday for My Time To Craft but it just doesn't want to post! I may have to copy and paste it all into a new post and see if that will resolve it. 

I have had a lovely few days away in Lowestoft, Suffolk with my mum visiting my daughter, son in law, aunt and uncle. We stayed at my aunt and uncle's holiday home, some of you may remember I lived there for a couple of months last year after my house was sold but I hadn't found anywhere to move to here in Lincolnshire. It was lovely having the beautiful weather and being able to spend time with my family whilst we relaxed around the swimming pool, I'm sure my daughter appreciated being able to cool off in the pool as she is getting quite big now especially considering how poorly she was at the beginning last week and during the beginning of her pregnancy. It was so hot in hospital, the air conditioning wasn't working and there just didn't seem to be any air at all. The only downside to our trip was that we should have taken my grandson Harley with us to been entertained by my aunt and uncle whilst we were with my daughter but he was ill with a really bad high temperature so had to stay home with mum and dad. I told him we will go again around September time once the children are back at school and hope we still have some nice weather.

Anyhow enough of my adventure's lol, it is time for a new challenge over at Natalie & Amy's Challenge and this month it is time to 'Celebrate' as this is our 12th challenge. As it was a year ago that the challenge blog first started Natalie and Amy are very generously giving away 2 surprise prizes this month woo hoo.

As soon as I saw this challenge I knew which image to use and that is Saturated Canary 'Ellie's Birthday', I think this is a great image for birthday's. I teamed it with some First Edition 'Summer Breeze' papers and Papermania Kraft Card, I then used a few die cuts cut on my Silhouette Cameo, some Marianne D's Jute Twine and finally added some Ranger Liquid Pearl dots in Opal White scattered around.

Supplies:-
6" Card Blank - Natalie & Amy's
Card Stock - Papermania Kraft Card from Nat & Amy's
Designer Paper - First Edition 'Summer Breeze' from Nat & Amy's
Image - Saturated Canary 'Ellie's Birthday' from Nat & Amy's
Twine - Marianne D's Jute Twine from Nat & Amy's
Pearl - Ranger Liquid Pearl 'Opal White' from Nat & Amy's
White Accents - Sakura White Jelly Roll Pen from Nat & Amy's
Sentiment - Computer Generated

Promarkers & Flexmarkers Used:-
Skin - Apricot, Oatmeal & Blush
Eyes - Cinnamon
Hair - Walnut, Auburn & Cinnamon
Pinks - Baby Pink, Pale Pink & Pink Mittens
Greens - Soft Green & Tea Green.

Challenges I would like to enter this into:-
Die Cuttin Divas - Anything Goes
Ladybug Crafts - Birthdays
Party Time Tuesdays - Anything Goes
Tuesday Throwdown - Birthday Party
Incy Wincy Designs - Birthdays & Balloons
My Craft Creations - Die Cuts
Stamp With Fun - Celebrate

Ok that is all from me today, I hope to catch up with you this week once I have caught up on my dt comments.

Thanks for stopping by, see you all soon.

Friday, 15 March 2013

Sparkles 'Birds' Challenge

Good morning all, the weekend is near and the weather is a little brighter so there is hope!

I cannot believe a whole month has gone by since I joined the lovely ladies at Sparkles Monthly Challenge and what a lovely lot of lace creations you entered. This month the challenge is 'Birds' so that means any kind of bird on your creation.  We are sponsored this month by Lili Of The Valley who are offering a £10 prize.

I was really struggling with this challenge as I don't really have any bird stamps apart from a Christmas one. I looked at some digi's and nothing jumped out at me so searched the Silhouette Store and found a few, then this pair appeared and I knew straight away I could use my Peachy Keen stamps to work with the die cut.

I had this clouds background from Hero Arts and sized it to fit the card blank, then cut the birds in the nest from Miss Kate Cuttables leaving out the face pieces. I used Peechy Keen Everyday Faces and just coloured the beaks. I used two different stamp sets for the sentiment and that was it, job done!


Supplies:-
6" Scalloped Card Blank - Boyes
Card Stock - Bazzill
Bless This Stamp - Studio G 'VS4911'
Home Stamp - Kars Castle 'Alphabet 2'
Silhouette Die Cuts - Clouds 'Hero Arts', Birds In Nest 'Miss K Cuttables'

Challenges I would like to enter this into:-
Anything Goes - Seeing Double

That's all from me for today, I will be back tomorrow with my My Time To Craft card. Thanks for stopping by.