
It's the time for another challenge over at

Ch# 14 Create your own Shaped Card
(No pre designed shaped card files)
Begins: Sunday, June 1
Ends: Monday, June 30
A blog dedicated to the Silhouette Cutting Machines.
You MUST use a Silhouette somehow in your project.
Sponsor this month is:


(3) Silhouette Replacement Blades
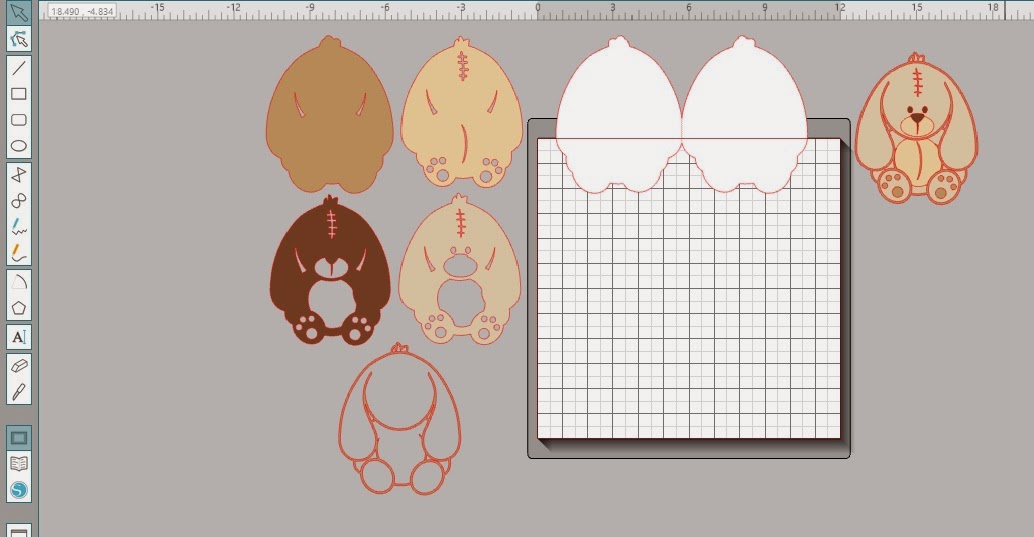
Ok so for my card I used this adorable 'Stuffed Bunny' file by Miss Kate Cuttables #57164 and available from the Silhouette Store. One of the questions I get asked a lot is "how do I make the card front whole and not have the score line showing with the edge cut off". So I have taken some photo's along the way to try and show this.
The white card base seen below is the same size as the base layer seen top left hand side of mat and the other pieces are all slightly smaller and layer on top.
Ok so for my card I used this adorable 'Stuffed Bunny' file by Miss Kate Cuttables #57164 and available from the Silhouette Store. One of the questions I get asked a lot is "how do I make the card front whole and not have the score line showing with the edge cut off". So I have taken some photo's along the way to try and show this.
- Once you have your imported shape on the mat build it up to how it will look once finished
- Next group those pieces together and resize to the desired size and copy it. Place the copy on the right have side of the mat so you always have a reference to go back to.
- Now ungroup the other set and lay all the pieces out on the left of your mat in the build order and colours you are going to cut them (see first image below).
- If the image has a solid base layer use this to create your shaped card base, if it doesn't have a solid base make an offset before you ungroup your pieces.
- With the base layer, offset it to the desired size, make a copy of it and place one of them back with your pieces on the left, mirror the other piece to the left creating the back of your card. Nudge these together so they just overlap enough to weld, once happy weld them. Using the line tool, and whilst holding the shift key down to ensure a straight line, draw a line between your welded pieces. Once you are happy that it is centred change this line to a dashed line in the cut settings. Group the card base and line together and fill with the colour you have chosen for the base.
- If your base layer has any cut outs in it you want to transfer these to the offset layer you made by centring the 2 pieces and then releasing the compound path. You will now be able to delete the smaller base layer leaving the cut outs on the offset base layer, next select all the pieces along with the offset layer and make a compound path.
The white card base seen below is the same size as the base layer seen top left hand side of mat and the other pieces are all slightly smaller and layer on top.


This is the edge showing how the first layer covers the score line.

Here is my finished card.

Supplies:-
Card Stock - Bazzill
Die Cut - Stuffed Bunny #57164 by Miss Kate Cuttables
Head in over to see what the DT has created for you inspiration and link up today.
Click HERE
18 comments:
Such a cute bunny! Great picture tutorial! ~DT Janis
Adorable!!!!
This is so cute! Thanks for the tutorial!
So adorable!! I love the idea of a cute bunny card!! Great job and thanks for the tips!
What a cute little bunny!!! So sweet!! Hugs!!
Stacey (DT sister)
Yep, just huggably adorable. Great card.
Tine :)
Oh Kim, this is absolutely precious!
Thanks for linking up over at Silhouette Challenges
Have a creative day.
Pam
♥ Scrap N Sew Granny ♥
♥ Pam's Stitched With Love ♥
♥ DT for Silhouette Challenges ♥
This is completely darling Kim! LOVE the shape! Super cute and perfect for this months challenge! :o)
Theresa (Silhouette DT Sister)
www.miislucky.blogspot.com
OMG Kim this card is too cute. I love that you have included the step by step tutorial. You rocked this challenge. Have a creative day.
Hugs Nana
♥ My Crafting Channel ♥
♥ Nana's Rag Quilts ♥
♥ 2 Creative Chicks ♥
♥ Silhouette Challenges ♥
Oh my gosh, adorable! What a great idea to include your tutorial!
This is very cute, love the texture of the card stock it makes the card even more special. Thanks for sharing the layout of the pieces, sometimes this can be the most time consuming part of a project.
That bunny is just too stinkin' cute!! Awesome card ;)
Awwww this is so sweet hun, just love it!
Hugs Shell xx
That is just super cute!
Awww this is an adorable card. I love it.
This is a totally awesome card Kim and thanks so much for you step by step tutorial.
Hugs
Carol x
Ohhhhh I LOVE, love, love this. Great tutorial on how you did it. So wishing I had one of those machines right now :o) Hugs D
Wow - how clever are you?!!!!
This is amazingly cute! ♡♡♡
Hugs
Penni
X
Post a Comment